
MainWP Child creates the backup archive. Your MainWP Dashboard downloads it, stores it locally, and uploads copies to the selected storage destinations. Backups do not upload directly from the Child Site to cloud storage.
MainWP Built-In Backups is available in MainWP 6.4 and later. Keep MainWP Dashboard and MainWP Child updated, and test backups and restores on a staging site.
What You’ll Learn
- Create your first backup and confirm where it is stored
- Schedule full, database, files-only, and incremental backups
- Connect storage destinations and protect backups with encryption
- Restore a site and roll back using a safety backup
- Manage retention and investigate failed jobs
Prerequisites
- MainWP Dashboard 6.4 running PHP 8.3 or higher
- The matching MainWP Child 6.4 release or later, running PHP 7.4 or higher
- A connected Child Site that syncs successfully
- An administrator account to enable and configure backup settings
- A private backup directory on the Dashboard server, writable by its PHP process and outside publicly served folders. See Set Up the Private Backup Directory.
- Enough free disk space on the Child Site and Dashboard for backup and restore files
- Working WordPress cron on the Dashboard for schedules and background tasks
- Storage credentials if you want copies outside the Dashboard
Find the Backup Screens
Open MainWP > Sites > Backups after enabling built-in backups.
A task defines what to back up, which sites to include, and when to run. A snapshot is a backup of one site at a particular time. One task can create snapshots for several sites.
Create Your First Backup
1
Enable built-in backups
Open MainWP menu (three lines, top right) > MainWP Settings > Backup Settings (
/wp-admin/admin.php?page=BackupSettings).If Select primary backup system is shown, select Built-In Backups. Turn on Enable Built-In Backups and click Save Settings.2
Choose where to store the backup
The backup stays on your Dashboard server unless you add another destination.For an additional copy, open Backups > Storage, add and test a destination, and select Use as default destination. See Configure Storage.
3
Select the site and start the backup
Open Backups > Snapshots & Restore (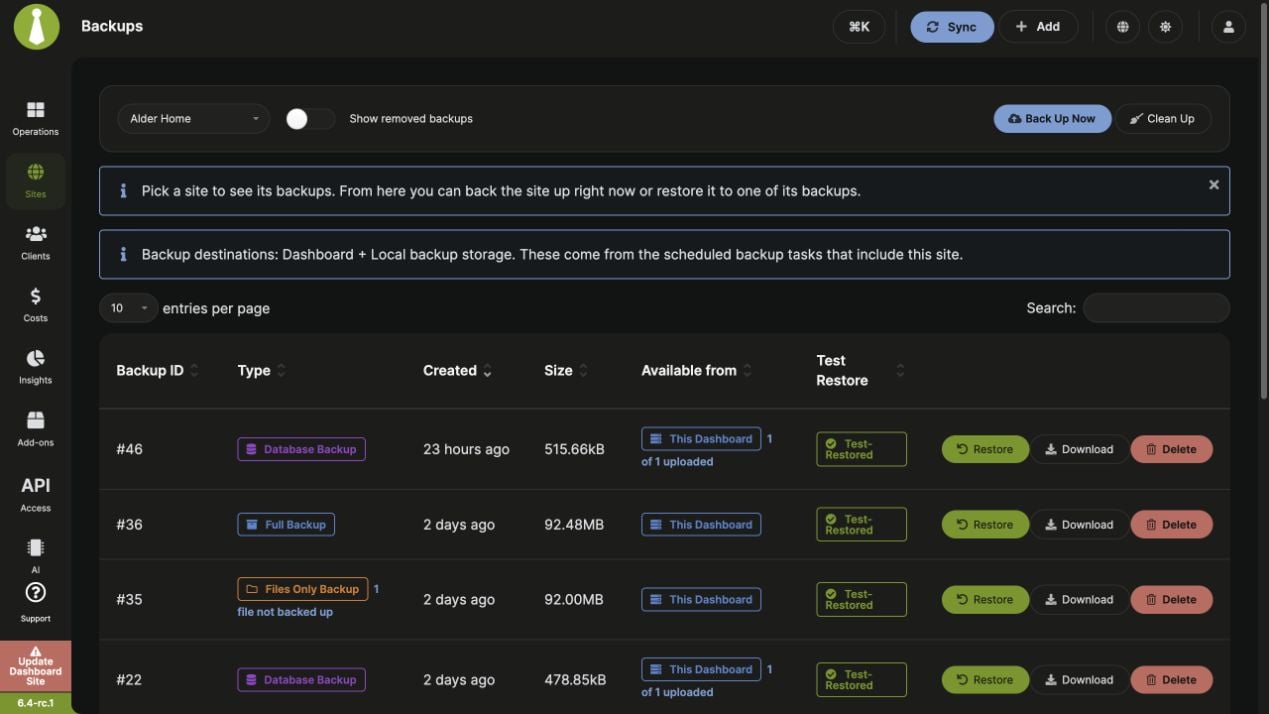
/wp-admin/admin.php?page=ManageBackupsSnapshots) and select your test site.Read the destination message, then click Back Up Now. This creates a full backup. To run a different backup type, create a task and use Run Now instead.4
Confirm the result
Wait for the backup to finish and confirm that a new snapshot appears with the expected date, type, and size. Review any files not backed up warning before relying on the backup.If you selected remote storage, wait for the upload to finish. See Check Backup Status.
Back Up Now uses the destinations selected on the site’s scheduled tasks. If those tasks have no destinations, the backup stays on the Dashboard. The default destination applies only to sites without a scheduled task.
Set Up the Private Backup Directory
MainWP Dashboard needs a private directory on its own server to store downloaded backups and working files, even when you use remote storage. This is separate from the temporary backup files MainWP Child creates on each Child Site. MainWP attempts to create the directory automatically. If you see Private backup directory is unavailable, configure a writable private location on the Dashboard server:-
Create a directory outside the Dashboard’s WordPress and
wp-contentdirectories, in a location that no website serves over the web. Make it writable by the PHP process running your Dashboard. -
Back up your Dashboard’s
wp-config.php, then add or updateMAINWP_BACKUP_PRIVATE_DIRbefore the line that loadswp-settings.php:Replace the example path with the directory’s actual absolute path on your Dashboard server. On Windows, MainWP Dashboard 6.4.2 and later accepts drive-letter paths such asD:/private/mainwp-backups. Editwp-config.phpon the Dashboard server. -
Retry the backup and confirm that it completes and appears under Backups > Snapshots & Restore (
/wp-admin/admin.php?page=ManageBackupsSnapshots).
sites/ folder into the new private backup directory so older backups remain visible and included in retention. See Preserve Built-In Backup Files.
What a Site Needs Before a Backup Can Run
A backup uses two machines. MainWP Child builds the backup on the Child Site. Your Dashboard then downloads it, keeps it on the Dashboard server, and copies it to any storage destinations you add. In MainWP Dashboard 6.4.2 and later, this list also appears under Back Up Now on Snapshots & Restore and on Backups > Add New. Click What a site needs before a backup can run to open it. On the Child Site:- MainWP Child is a version that supports Built-In Backups. If it is too old, the backup stops and asks you to update MainWP Child and sync the site.
- The site is connected to the Dashboard. Disconnected and suspended sites cannot be backed up.
- The web server can write to the MainWP backup folder in the site’s uploads folder, usually
wp-content/uploads. MainWP Child keeps its working files there. - The disk has room for the backup plus a reserve: a tenth of the disk, at least 100 MB and at most 1 GB. The Dashboard also will not start a backup when the site reports less than 50 MB free. Some hosts turn off the PHP functions that report disk space; MainWP then skips this check.
- For file backups, the
wp-contentand uploads folders are inside the WordPress folder. Hosts that move them, such as Pressable, WordPress.com, and Bedrock installs, can run database backups but not file backups yet. - For backups that include the database, the site uses one database server. Sites that spread the database across several servers with a
db.phpdrop-in, such as HyperDB or LudicrousDB, can only run a Files Only Backup.
- PHP has the cURL and OpenSSL extensions.
- The Dashboard has a private folder that the web server can write to and no website serves. By default, it creates a
mainwp-privatefolder beside the WordPress folder. On hosts that provide aprivate_htmlorprivatefolder, it can use that instead. If none of these work, see Set Up the Private Backup Directory. - The disk has room for the backups the Dashboard downloads.
Configure Storage
Completed backups are stored in the Dashboard’s private backup directory, organized by Child Site. Storage destinations receive copies uploaded by the Dashboard. A Local Path destination also refers to a path on the Dashboard server. Keep enough free space on both the Dashboard and Child Site to create and process backups, even when using Remove local archives after upload. When moving the Dashboard, include its private backup directory in the transfer.1
Add a destination
Open Backups > Storage (
/wp-admin/admin.php?page=ManageBackupsStorage) and click Add Storage Destination. Enter a descriptive Destination name, then choose a Provider.2
Enter the provider details
Enter the details listed below for your provider. The account needs permission to upload, read, and delete backup files at that destination.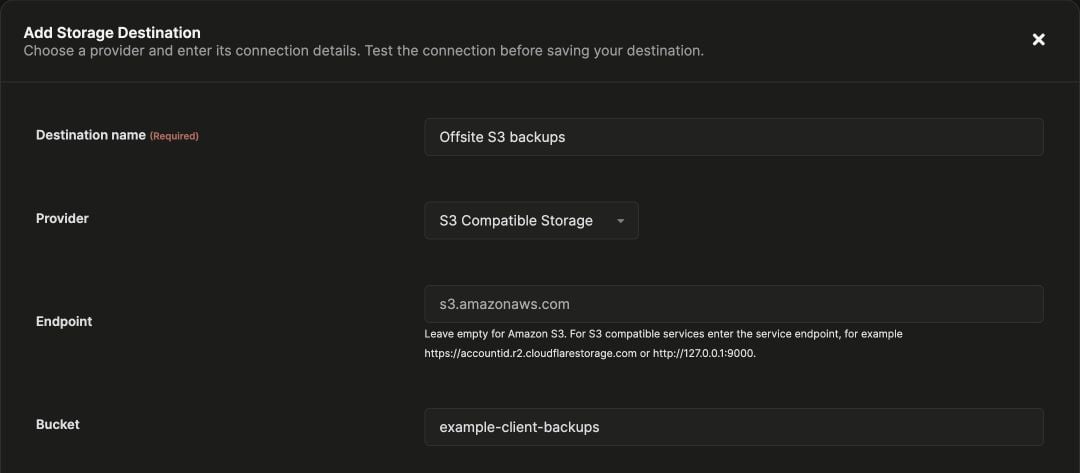
3
Test and save
Click Test Connection & Save. Resolve any connection error before assigning the destination to a backup task.For Dropbox, use Connect Dropbox to approve the connection. A successful connection tests and saves the destination. For pCloud, authorize the account before saving.
4
Assign the destination
On each backup task, select one or more destinations under Upload to storage.Choose Use as default destination or Make Default to preselect a destination for new tasks. Update existing tasks separately if you want them to use it.
For SFTP, you can supply the server’s Host key fingerprint to verify its identity. If left empty, the first key received is trusted and pinned. Obtain the fingerprint from your server administrator when possible.
Local Path does not count as offsite storage, even on a mounted drive, and cannot satisfy Require an offsite-verified backup.
Set Minimum retention (days) on a destination to protect its copies from automatic cleanup for a minimum period. The default is zero, which disables this protection. See Minimum Retention at a Destination.
S3 Bucket Names with Dots
By default, MainWP places the bucket name before the storage endpoint in the request hostname. If the bucket name contains a dot, such asexample.com, HTTPS requests can fail with an SSL certificate hostname mismatch.
For Amazon S3 or Wasabi buckets containing dots, enable Path style addressing. This places the bucket name in the URL path instead. Other S3-compatible services may have different addressing requirements; follow your provider’s guidance.
Open Backups > Storage (/wp-admin/admin.php?page=ManageBackupsStorage) and configure the destination. In MainWP Dashboard 6.4.1 and later, MainWP enables Path style addressing by default for new destinations with dotted bucket names on recognized Amazon S3 and Wasabi HTTPS endpoints. Existing destinations keep their saved setting. Verify Path style addressing is enabled, then click Test Connection & Save.
For example, use these settings for a Wasabi bucket in eu-central-1:
The Endpoint must match the bucket’s region. Enter the bucket name in the separate Bucket field; do not include it in the endpoint. Check Wasabi’s regional service URLs for your bucket’s region.
For background, see Amazon S3’s dotted-bucket certificate limitation and Wasabi’s path-style recommendation.
Share a Bucket Between Sites
You can use one private Amazon S3 or Backblaze B2 bucket for multiple Child Sites connected to the same MainWP Dashboard. For B2, select S3 Compatible Storage and enter the bucket’s S3-compatible endpoint. MainWP stores each site’s snapshots under separate paths in the bucket. The Dashboard uploads the backups and keeps the storage credentials; it does not send those credentials to Child Sites. Sharing a destination does not give a Child Site permission to browse or download another site’s backups. For eligible restores of unencrypted backups, the Dashboard can send the Child Site temporary download links for the required backup files. These links expire after one hour and grant access only to the specified files. Encrypted backups are downloaded and decrypted on the Dashboard before being transferred to the Child Site. Keep the bucket private and do not share its credentials with Child Sites. Separate paths organize the backups but do not create independent storage permissions. Anyone with bucket-wide access can access the backups, and anyone with a temporary download link can use it while it remains valid.Understand the Cloud Backup Layout
In MainWP Dashboard 6.4.2 and later, new remote backup folders include the site ID and a version of the site name, followed by the snapshot ID. For example,12-client-site/34/ contains snapshot 34 for Child Site 12. Existing backups keep their original paths, such as 12/34/. Renaming a site does not rename its existing backup folders.
Inside a snapshot folder, you may see:
Splitting larger archives into chunks lets interrupted uploads resume. A large backup can produce many chunk files; seeing
.bin files instead of a ZIP or Tar GZip archive is expected. The Backup file name tokens do not change these cloud folder paths or hashed chunk names.
Use Snapshots & Restore to find backups by site and date and restore a completed remote copy. For a downloadable archive, see Download a Backup.
Encrypt Backup Archives
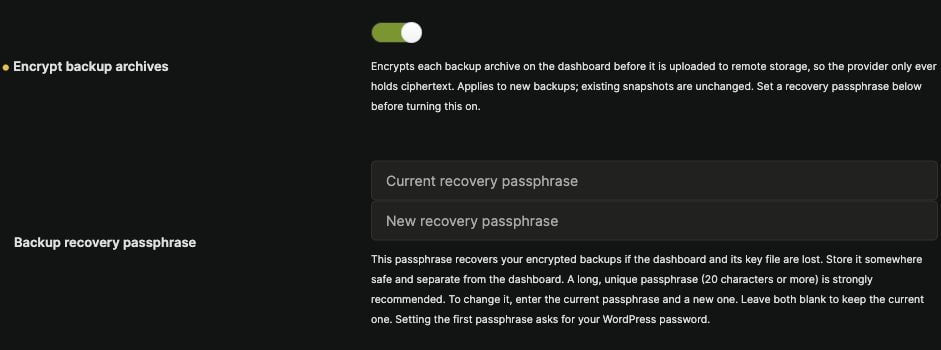
Open MainWP menu (three lines, top right) > MainWP Settings > Backup Settings (/wp-admin/admin.php?page=BackupSettings):
- Turn on Encrypt backup archives to show the Backup recovery passphrase fields.
- Set a recovery passphrase. The first setup also asks for your WordPress password. Use at least 12 characters; a long, unique passphrase of 20 characters or more is recommended. Store it separately from the Dashboard.
- Click Save Settings and confirm that encryption remains enabled.
Create a Scheduled Backup
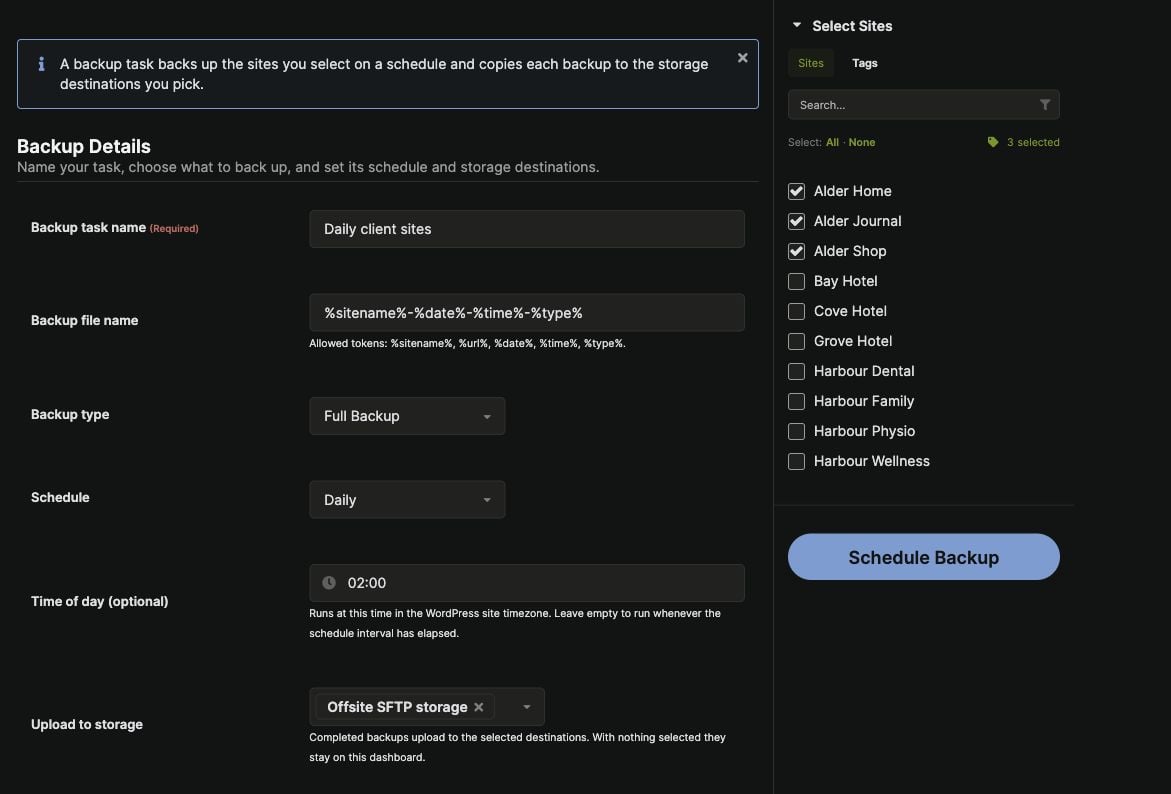
Open Backups > Add New (/wp-admin/admin.php?page=ManageBackupsAddNew).
1
Name the task and select its sites
Enter a Backup task name that describes its purpose, such as “Daily client sites”. Select the Child Sites to include. If MainWP flags a site running MainWP Child older than 6.4, update the plugin on that site and sync it before adding it to the task.
2
Choose the backup type and schedule
Select a Backup type from the table below. Choose Daily, Weekly, Monthly, or Every N hours.Times use the Dashboard WordPress site’s timezone. Monthly schedules accept days 1 through 28. Leave the optional time empty to run the task at the next scheduler check after its interval has elapsed.If tasks share a start time, use Spread scheduled backup starts to stagger daily, weekly, and monthly tasks. Check the adjusted time under Next Run.
3
Choose storage, exclusions, and retention
Select destinations under Upload to storage, review Backup Excludes, and set Backup Retention.Leave storage empty to keep backups only on the Dashboard. Set retention limits to control storage use.
4
Save and run a first test
Click Schedule Backup. On Manage Backups, click Run Now for the task to test its configured type and destinations.Check the result for each site, then confirm the task’s Next Run.
Choose a Backup Type
An incremental chain includes the initial full backup and the later incremental backups that depend on it. Keep the chain together so MainWP can restore the selected snapshot.
The first incremental task run is full even when started with Run Now. If a Child Site lacks incremental support, MainWP takes full backups and records a note on the task. Keep MainWP Child updated and sync the site after updating.
Database and Disk Usage
Built-in backups use database space for task and snapshot records, and disk space for backup files and file inventories. Incremental tracking does not create a database row for every site file.
Database usage varies with backup frequency, the number of snapshots and storage destinations, archive and upload chunk counts, and restore activity. There is no fixed database-space figure per site or backup.
Retention removes backup files and their associated upload records, but keeps snapshot records so removed backups can appear in the removal history. Background cleanup removes run history older than 90 days. The Storage cap (MB) setting applies to backup files; it does not set a database size limit.
Archive Format and Exclusions
Archive type can use the site setting, the global setting, or an explicit format. The available formats are Zip, Tar, Tar GZip, and Tar BZip2. For large sites, use Tar GZip. MainWP can switch large Zip backups to Tar GZip unless Keep Zip even when the site is large is enabled. Review the exclusion switches for known backup locations, known cache locations, non-WordPress folders, and ZIP archives. In MainWP Child 6.4.2 and later, Known backup locations covers the standard backup folders for All-in-One WP Migration, UpdraftPlus, and Duplicator. Excluding old backup archives avoids repeatedly backing up earlier backups. Do not exclude files you expect to recover. Enter Custom excludes as paths relative to the Child Site’s WordPress directory, separated by newlines or commas. For example,wp-content/cache. To exclude the standard WordPress uploads folder, use wp-content/uploads. To exclude only a form upload folder, enter that folder’s actual relative path. Excluded files will not be available from that backup during restore.
Database Dumps and the Clone Folder
The database portion of a backup contains a separate.sql.php file for each table. Each file starts with <?php exit(); ?>, followed by SQL. The .php extension allows a PHP-enabled web server to run this guard and stop before displaying the database contents if the file is requested over HTTP. MainWP reads this format automatically during a restore.
In a full backup archive, the database dump files are placed under wp-content. This location is part of MainWP’s archive format. There is no setting to move them to the archive root or another subfolder.
The clone folder contains config.txt, which holds metadata used by MainWP’s backup/cloning format, including the original site URLs, WordPress path, database table prefix, and lists of plugins and themes. Built-in file restores skip this metadata file.
Performance on Larger Setups
Backup work uses resources on both the Child Site’s server and the MainWP Dashboard. The Child Site creates the database dump and archive. The Dashboard downloads and stores the backup, encrypts it when enabled, and uploads copies to the selected storage destinations. Remote storage still requires disk space and transfer bandwidth on the Dashboard. Completion times depend on database size, file count, archive size, server resources, and transfer speeds. Site count alone does not determine the resources your setup needs.- Create separate scheduled tasks for groups of sites and give them different start times. Spread backups throughout the day, especially for sites that share a server.
- Start with a small, representative group that includes a larger site. Check backup and upload completion times, server load, free disk space, and bandwidth use on the Dashboard and Child Site servers before expanding to more sites.
- Consider incremental backups to reduce the file data saved after the initial full backup. Each run still includes a fresh database dump.
- Review archive formats and exclusions to avoid repeatedly archiving caches, old backups, and other folders you do not need to recover. Use retention limits to control storage use.
Check Backup Health
View Backup Health in MainWP > Sites > Manage Sites (/wp-admin/admin.php?page=managesites) or MainWP > Operations (/wp-admin/admin.php?page=mainwp_tab). The summary appears when built-in backups are enabled and your account has permission to run backups.
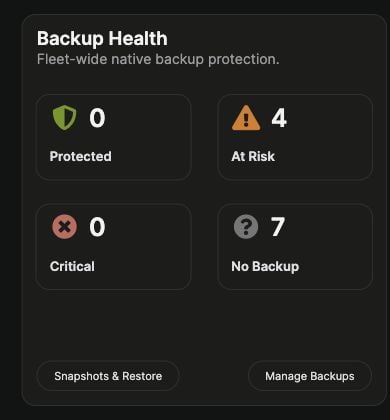
Click a status to filter Manage Sites to the matching sites. For At Risk, check the backup schedule and storage uploads. For Critical or No Backup, run a backup and confirm it completes.
A recent backup stored only locally shows At Risk. Protected confirms backup age and offsite verification; it does not confirm a successful restore test. See Check Backup Status for upload and restore-test results.
Check Backup Status
Open Manage Backups (/wp-admin/admin.php?page=ManageBackups) to check Last Run, Next Run, destinations, and errors. Hover over Last run reported errors or Last run notes to read the details. These badges show tooltips; they do not open a copyable log. Use Export Diagnostics for a downloadable report.
Starting a task with Run Now opens a progress window. Use View Progress or View Result to inspect the run. Closing the progress window leaves the backup running.
Click Cancel Backup in the task’s progress window to stop the current run. Completed sites keep their backups, and the task’s schedule stays unchanged.
For an on-demand backup, use View progress on Snapshots & Restore to reopen its progress window or Cancel backup to stop the current run.
Use the task’s action menu to Edit, Pause, Resume, or Delete it. When deleting a task, clear Also delete this task’s snapshots if you want to keep its backups. This option is selected by default.
A later Clean Up for the site deletes these retained snapshots and their cloud copies. See Retention and Cleanup.
On Snapshots & Restore, select a site and check Available from and the upload details.
If a snapshot shows files not backed up, click the warning to inspect the listed paths. A completed backup can still omit files. Resolve any unexpected omissions and create another backup before relying on it.
Offsite Verified includes remote file size checks. It does not confirm that the backup can restore the site.
Read Test Restore Results
The Test Restore column shows the results of automatic checks on selected backups. MainWP tests them in a temporary environment on the Dashboard. Hover over the result for details, including the reason a test failed or could not run. If Couldn’t test here mentions database permissions, ask your hosting provider to let the Dashboard database account create and drop its own temporarymainwp_tr_ databases and import and read the tables in them. Permissions on the Dashboard’s existing database alone are insufficient. The same status can indicate an unsupported backup format or a missing server extension. Check the tooltip to distinguish these cases.
Test a full restore on a staging site before relying on a backup for recovery.
Read Backup Errors
In MainWP Dashboard 6.4.2 and later, a backup error shows a short label with the full error below it. When you click Back Up Now, the Backup Progress window opens. If the backup fails, the short label appears on the progress bar and the full error appears in the red box under it. After you close the window, a message on Snapshots & Restore keeps the short label and adds a View details link. Click it to reopen the Backup Progress window and read the full error. You can also reach the link with the Tab key and open it with Enter. While a backup is still running, the same link reads View progress. If cancellation fails, the message on Snapshots & Restore keeps the full cancellation error while progress updates continue.Errors in Run Now
When you click Run Now on Manage Backups, the progress window lists each site in the task. In MainWP Dashboard 6.4.2 and later, a site that fails shows its error in red under the site name. If MainWP received no details, the line reads Backup task failed. Screen readers announce the error when it first appears and again only if it changes.Find Where a Folder Error Comes From
A folder error can come from the Child Site, the Dashboard server, or an SFTP server you added as storage. The folder can be missing or locked on any of them. In MainWP Dashboard 6.4.2 and later, folder errors name the machine:
These are the folder errors you may see, grouped by machine:
- Child Site:
- “The MainWP backup folder in the uploads folder on the child site is not writable.”
- “Could not create the ZIP archive on the child site.”
- “Could not write to the backup archive on the child site.”
- Dashboard server:
- “The folder … does not exist on the Dashboard server.” or “The web server cannot write to the folder … on the Dashboard server.” These come from testing a Local Path destination.
- “Backup directory … on the Dashboard server cannot be used.” Check the Directory path of the Local Path destination.
- “Private backup directory … is unavailable.” Check the private backup directory.
- SFTP server:
- “The folder does not exist on the SFTP server.”
Backup Notification Emails
Review Send email when backup starts and Send email when backup fails under MainWP menu (three lines, top right) > MainWP Settings > Backup Settings (/wp-admin/admin.php?page=BackupSettings). Confirm that your Dashboard can send email before relying on these alerts.
Scheduled backup alerts normally go to the WordPress profile email of the account that last saved the task. To change that account’s address, sign in as that user and open WordPress Users > Profile (/wp-admin/profile.php). A previously saved MainWP notification address from an older setup can take precedence. There is no separate recipient list for backup alerts on Backup Settings, and the recipient lists on Email Settings do not control these alerts.
The failure alert covers errors while executing the scheduled backup task. A later failure during a remote upload does not trigger that alert; also check the snapshot’s upload status.
Download a Backup
Click Download beside a snapshot when its archive is available on the Dashboard. Incremental backups cannot be downloaded as one archive. Use Restore to restore the selected point in the chain. Backups stored only on remote storage can be restored, but cannot be downloaded through the Dashboard.Retention and Cleanup
Each scheduled task has its own Backup Retention settings, applied separately to each Child Site. For example, Keep last set to seven is a separate count for each site in that task, not a shared total across all selected sites. Another task for the same site has its own policy.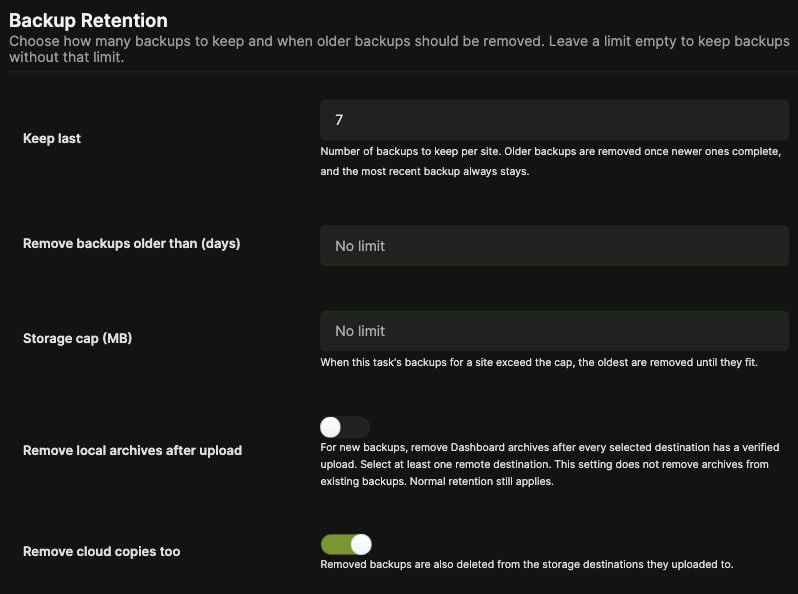
When task retention removes a backup, it removes the Dashboard’s backup files. Enable Remove cloud copies too to include the corresponding remote copies in that cleanup. If it is off, the remote copies remain.
Enable Remove local archives after upload to save disk space on the Dashboard after uploads finish. It applies to new backups created by the task, including runs started with Run Now, and leaves existing backup archives unchanged. MainWP keeps the file inventories needed for incremental backups. Snapshots whose archives are available only remotely show Remote only and can still be restored, but cannot be downloaded through the Dashboard. Normal task retention still applies.
Leave a retention limit blank or enter zero for no limit. Each enabled limit can make older backups eligible for removal. For example, Keep last set to seven can remove an older backup before a 30-day age limit is reached. For age-based cleanup alone, leave Keep last and Storage cap (MB) blank. The age limit is a cleanup threshold, not a guaranteed minimum storage period.
Scheduled retention keeps the newest complete, restorable backup or chain for each task and site, even if it exceeds the storage cap. Incremental chains are kept or removed together, so Keep last counts chains rather than individual snapshots.
For Back Up Now, set On-demand backups to keep under MainWP menu (three lines, top right) > MainWP Settings > Backup Settings (
/wp-admin/admin.php?page=BackupSettings). The default is five per site, with a minimum of one.
Leftover backup files to keep in Backup Settings controls cleanup of older downloaded files in each site’s backup folder on the Dashboard. It applies to files that are not protected by completed snapshots or active runs. The default is one; zero keeps all leftover files. It does not limit completed snapshots or copies at storage destinations.
- Use Delete to remove a backup. Select Also delete cloud copies to remove its copies from storage destinations.
- Use Clean Up to remove leftover files from interrupted backups, prune on-demand backups beyond the keep count, and delete snapshots whose task was deleted.
- Enable Show removed backups to see removal history and reasons.
Minimum Retention at a Destination
Open Backups > Storage (/wp-admin/admin.php?page=ManageBackupsStorage) and add or edit a destination. Set Minimum retention (days) to the minimum time its copies should remain before automatic cleanup can remove them. Set it to zero to disable this protection.
The period starts when the upload is verified. For older backups without a recorded upload time, MainWP uses the snapshot’s creation time. Task count, age, and storage limits do not override this minimum. A protected snapshot can also keep its incremental chain from being removed automatically.
Manual deletion can override the minimum. Review the confirmation before deleting a snapshot or its cloud copies.
Restore a Backup
You can restore a snapshot to its original Child Site. Connect the site and wait for any running backup or restore to finish before starting.1
Select the site and snapshot
Open Backups > Snapshots & Restore (
/wp-admin/admin.php?page=ManageBackupsSnapshots). Select the site, check the snapshot date and type, and click Restore.MainWP can use an available local or completed remote copy. For incremental backups, the required chain must be available.2
Review what will be replaced
A full or incremental restore replaces files and database content. A database restore changes the database only; a files-only restore leaves the database in place.Changes made after the snapshot may be lost. Review any warnings before proceeding.See How Files and Database Tables Are Restored for cleanup rules and exceptions.
3
Keep the safety backup enabled
Leave Create a safety backup first selected. This backup stays on the Child Site and lets you roll back if the restore fails or you need to undo it.Confirm I understand this replaces the current site content, then click Start Restore.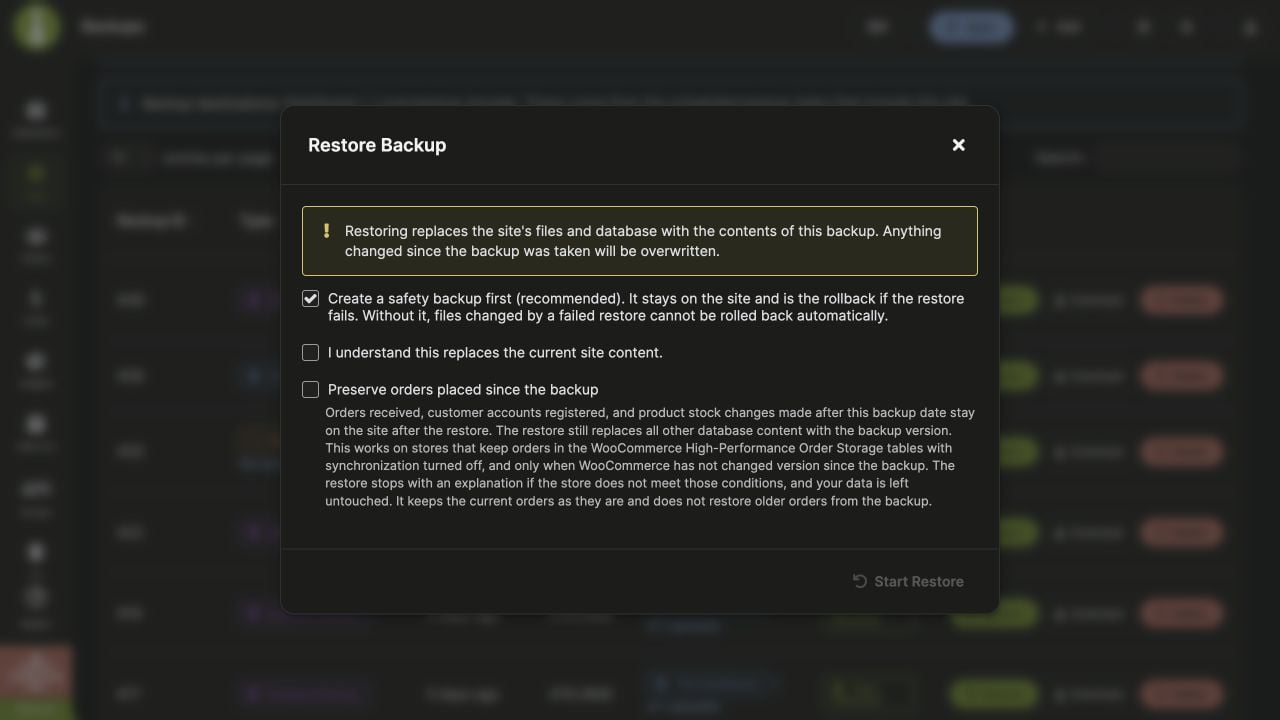
4
Check the restored site
Wait for Restore completed, then click Visit site. Check key pages, sign-in, and other site functions. Review any warnings and the Recent restores list.
How Files and Database Tables Are Restored
MainWP restores the snapshot in place. It does not delete the entire site and database before restoring. Files: MainWP restores the backed-up files, then compares the site against a file inventory saved automatically with the backup. It removes files that are absent from that inventory within the backup’s scope, with these exceptions:wp-config.phpandwp-content/object-cache.php- MainWP Child and MainWP’s data and backup directories
- Existing
mu-pluginsfiles that are absent from the backup - Paths excluded from the backup, symbolic links, and certain files required by the site’s configuration
- Files that could not be archived during the backup
Cancel or Roll Back a Restore
Cancel Restore stops further processing but does not undo files already replaced. If a safety backup is available, use Roll Back to return to the site’s state before the restore. In 6.4.2 and later, rollback can remove files introduced by the restore when they fall within the safety backup’s scope and MainWP can verify its file inventory. Review any rollback warnings and check the site afterward. If the restore finished on the Child Site but the Dashboard cannot reconnect, click Stop Checking to end the connection checks. This marks the restore as failed without rolling it back. Visit the site to check its state. After a failed database restore, resolve the reported database problem before removing maintenance mode.Restore From the Command Line
If WordPress Admin or the Dashboard is unavailable, you can restore a built-in backup directly on the Child Site server with WP-CLI. This path does not create a safety backup. See Restore a Built-In Backup for the command and destination URL behavior.Restoring a WooCommerce store
Restoring a WooCommerce store
Restoring a database normally replaces orders, customers, and other data with the snapshot’s version.When available, select Preserve orders placed since the backup to keep live order tables and reapply recent customer and stock data. This requires High-Performance Order Storage (HPOS), order-table synchronization turned off, an HPOS backup, and a matching WooCommerce database version. Older order-table contents from the backup are not restored.If those conditions are not met, the restore stops with an explanation. Review order, customer, and stock data after any store restore.
Require a Backup Before Updates
In MainWP menu (three lines, top right) > MainWP Settings > General Settings > Updates Settings (/wp-admin/admin.php?page=Settings), enable Require a backup before an update and set Days without a full backup (tolerance).
Use this setting to require a recent backup before updating from Manage Sites. In MainWP Dashboard 6.4.1 and later, the same check also applies when starting updates from the Updates, Plugins, and Themes pages.
Built-in backups accept completed full, database-only, or incremental backups within the allowed age. Files-only backups do not qualify.
Enable Require an offsite-verified backup to also require verified copies on remote storage. Local Path destinations do not count as offsite storage. Wait for remote uploads to finish before retrying the update.
For recovery after a failed update, see Safe Updates & Rollback.
Automate Backups
MainWP Dashboard 6.4 includes 32 backup abilities for reading status, managing tasks and destinations, running backups, and restoring snapshots. Use the WordPress Abilities API directly or connect an assistant through the MainWP MCP Server. Actions support a preview before confirmation. Backup and restore jobs continue in the background, so follow their progress until completion.Troubleshooting and Limitations
Sites with
wp-content or uploads outside the WordPress core directory, including symlinked folders, cannot use file backups or restores. Create a Database Backup task for these sites; Back Up Now always creates a full backup.
Database-only backups and restores remain supported. A database-only restore can stop before making changes if Create a safety backup first is enabled, because that safety backup includes files. Keep an independent database backup, then restart the database-only restore with Create a safety backup first turned off.
Export Diagnostics
Export diagnostics from MainWP menu (three lines, top right) > MainWP Settings > Backup Settings (/wp-admin/admin.php?page=BackupSettings).
- Enable Backup run diagnostics and click Save Settings. The Export diagnostics data button appears after saving.
- If diagnostics was not enabled when the problem occurred, run the affected backup task again to record it. If it was already enabled, you can export the existing data.
- Click Export diagnostics data to download the report to your computer. Attach the downloaded file to your support request with the task name, backup type, storage provider, and time of the failed run.
tasks.json in a text editor to read the stored task errors under backup_errors and notes under backup_notices. Detailed run events are in the events/ folder as .jsonl files. If ZIP support is unavailable on the Dashboard, the report downloads as a JSON file instead.
This is a diagnostics package for troubleshooting, not an on-screen log viewer. Detailed run logs are recorded only while diagnostics is enabled and are kept on the Dashboard for up to two weeks.
API Backups
To create and restore backups through your hosting provider, see API Backups. Provider setup instructions include:Self-Check Checklist
- Built-in backups are enabled and the test Child Site syncs successfully
- A first backup completed and appears under Snapshots & Restore
- The expected storage copies completed, including Offsite Verified when required
- Scheduled tasks have the intended sites, destinations, exclusions, and retention
- The recovery passphrase is stored separately if encryption is enabled
- A restore has been checked on a test site
- The Dashboard itself has a separate backup
Related Resources
- API Backups - Hosting-provider backup integrations
- Backup Add-ons - Third-party backup plugin integrations
- MainWP Dashboard Settings - General configuration
- Cron configuration - Keep scheduled work running